
Ever dreamt of turning your computer into a personal playground for WordPress, where your imagination knows no bounds? Then installing WordPress on localhost is the best way.
You don’t need to do a single line of code or any domain and hosting plans, rather you can develop and test all of its design, functionalities, and overall performance of your WordPress site.
But how to install WordPress on localhost? Well, there are multiple ways to install WordPress in localhost.
In this write-up, I’ll show you the easiest and fastest ways to set up your WordPress site on localhost in just 3 steps along with installing themes and essential plugins.
Let’s get started!
📌 Quick Overview
➡️ Download & install LocalWP
➡️ Create a new WordPress site
➡️ Setup the environment, themes and plugins
How to Install WordPress on Localhost – 3 Simple Steps
There are 5 popular platforms to install WordPress or similar CMS on Localhost. You can set any of them according to your operating system and PC configurations.
Among them, XAMPP and LocalWP (also called Local) are compatible with any operating system including Windows, Mac, and Linux.
However, XAMPP is the most popular but requires multiple steps to set up the website. On the other hand, LocalWP or Local is the fastest and easiest way to set up WordPress locally. All the settings and database are set automatically as well as you can set custom settings too.
So, which one will be better? 🤔
Well, you could find the “Local or LocalWP” is the most reliable choice so far considering the versatility, ease of setup, security, and user-friendly interface. 🔥
So, are you ready to discover the quickest and simplest method for installing WordPress on your local host?
Without any further ado, let’s start developing a WordPress website locally in simple 3 steps.
Step 1: Download and Install Local (LocalWP)
First, you need to set up your environment by installing a local host server on your computer. For this, download and install the LocalWP on your local machine.
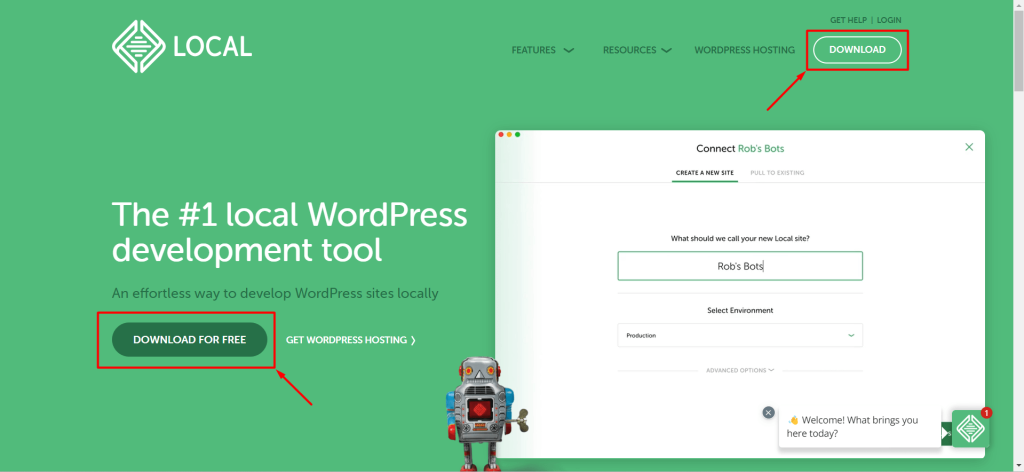
- Go to https://localwp.com/
- To download, click on the “Download” or “Download for Free” button.
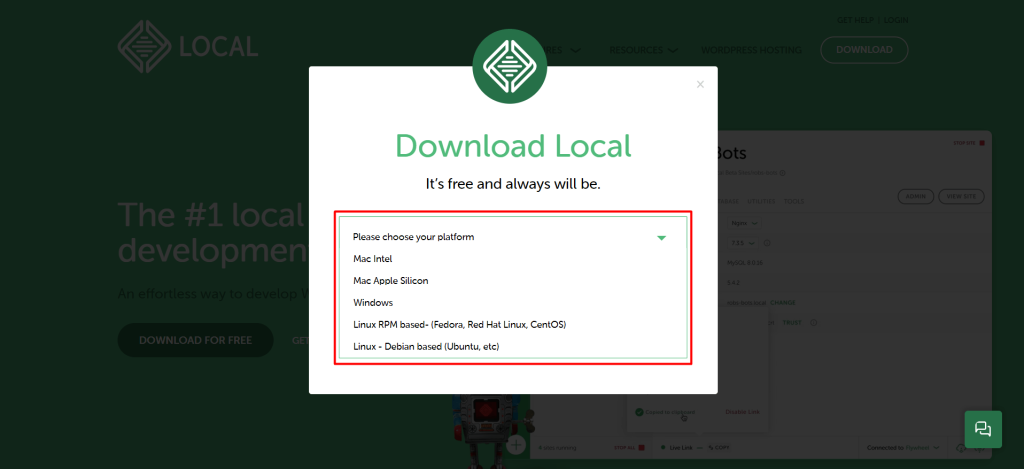
- Choose the platform – Mac Intel, Mac Silicon, Windows, Linux RPM-based, or Linux Debian-based.
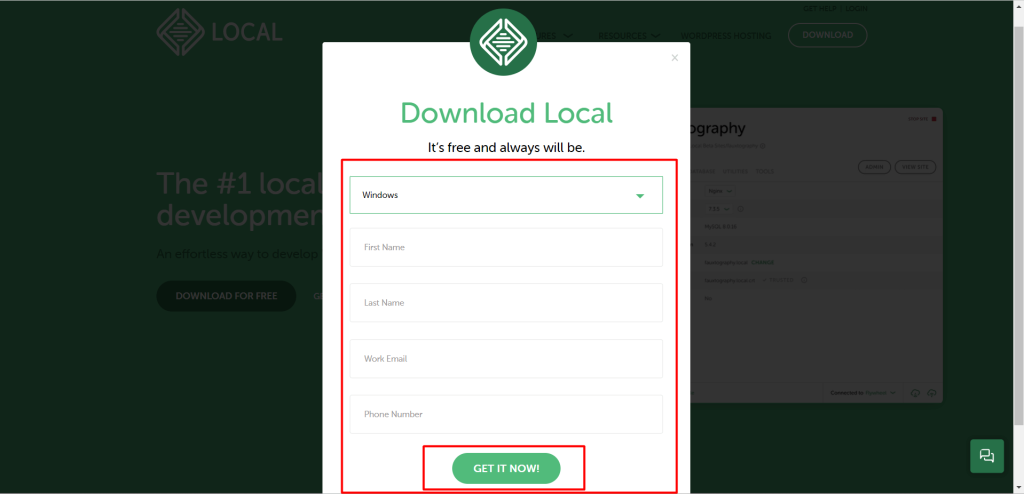
- A form will pop up. Fill the form with your First Name, Last name, Email, and Phone number
- Click on “Get it Now” and it will start downloading immediately.
- After completing the download, click on it and install the Local to your PC following the instructions like installing any other software.
📍Important Note: LocalWP requires at least 4 GB of RAM and 1.5 GB of disk space.
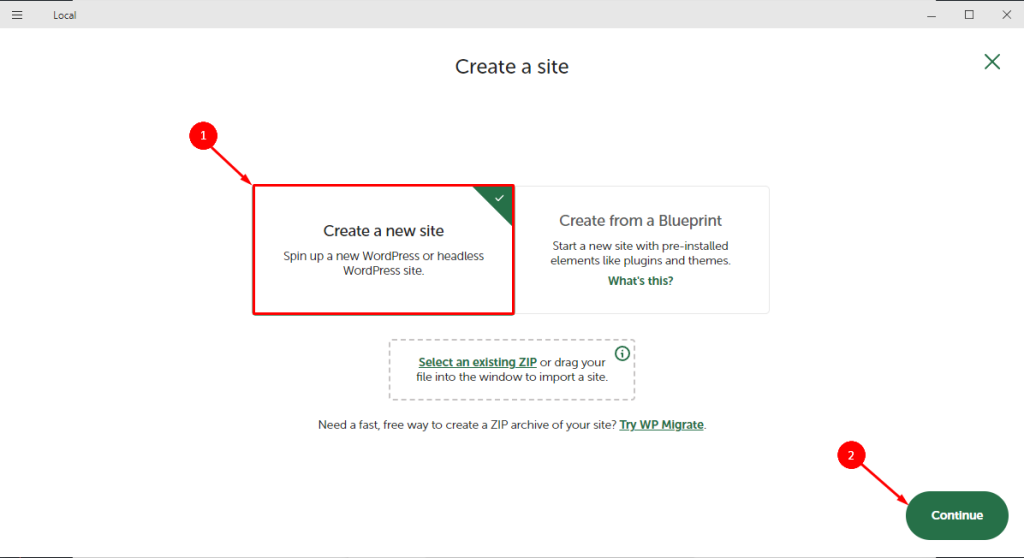
Step 2: Create a New Site
The Next step is to create a new site. For this, open the Local on your PC.
- Click on the (+) button at the left bottom
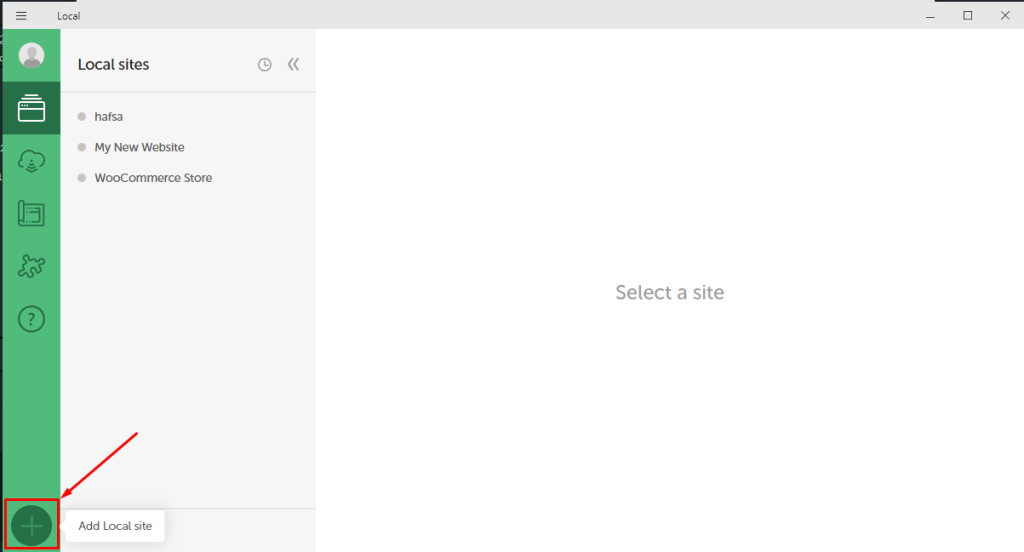
- Select the “Create a new site” option
- Click on the “Continue” button
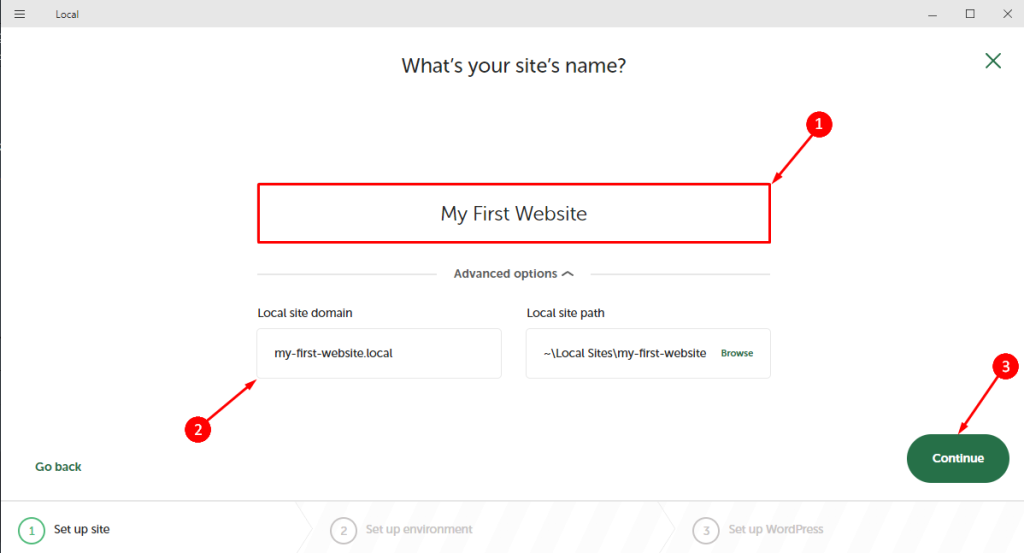
- Next, put a name for your website. For instance, I set my local website name as “My first Website”
- At the “Advanced options”, you can see 2 automatically generated things.
- The domain name of your local site – it contains the .local extension with the given name. Like my-first-website.local
- Location of your site in your computer – shows the local site path
- Click on the green “Continue” button at the left bottom corner.
Step 3- Setup the WordPress Environment
Now, here you can see 2 options including the “Preferred” and “Custom”.
- With the preferred option, the latest PHP, MySQL, and nginx Servers will be installed for your website.
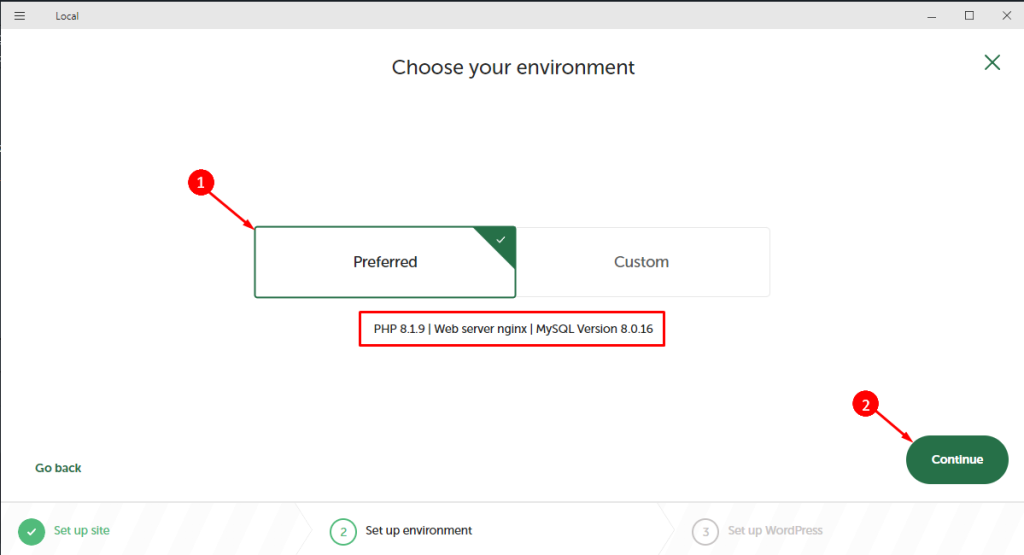
- You can select other versions of PHP and MySQL, and select “nginx” or “Apache Server” by the custom setting.
- After selecting the environment, click on “Continue”.

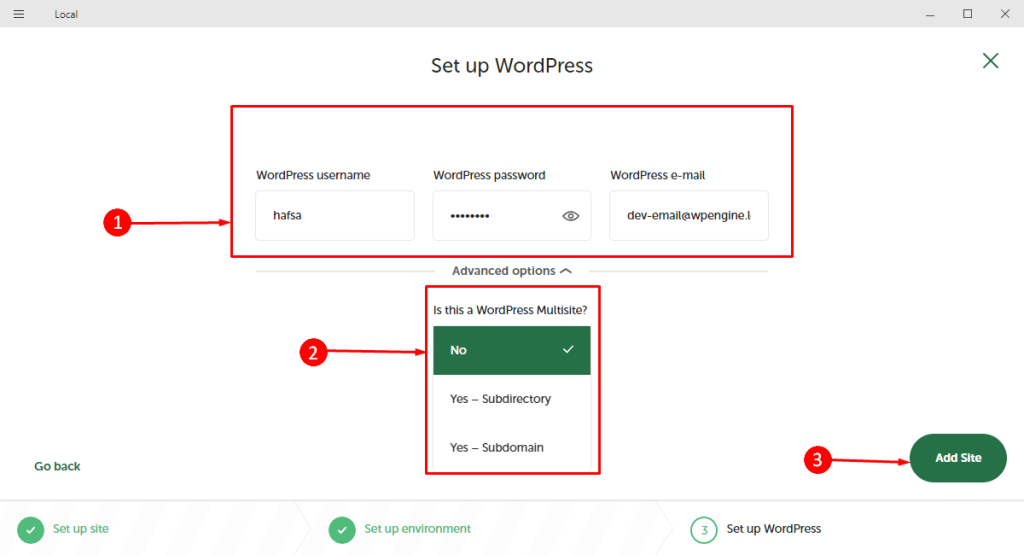
- Next, set up the WordPress site giving the username, password, and email.
- You can also create a multisite by selecting the subdomain or subdirectory site from the
“Advanced” setting.
- After that, click on “Add site”
It will take a few seconds and you are ready with your new WordPress website in your localhost. 🥳
How to Configure WordPress Website on Local?
You can see your new Website details here. Local allows you to do the following things from this interface:
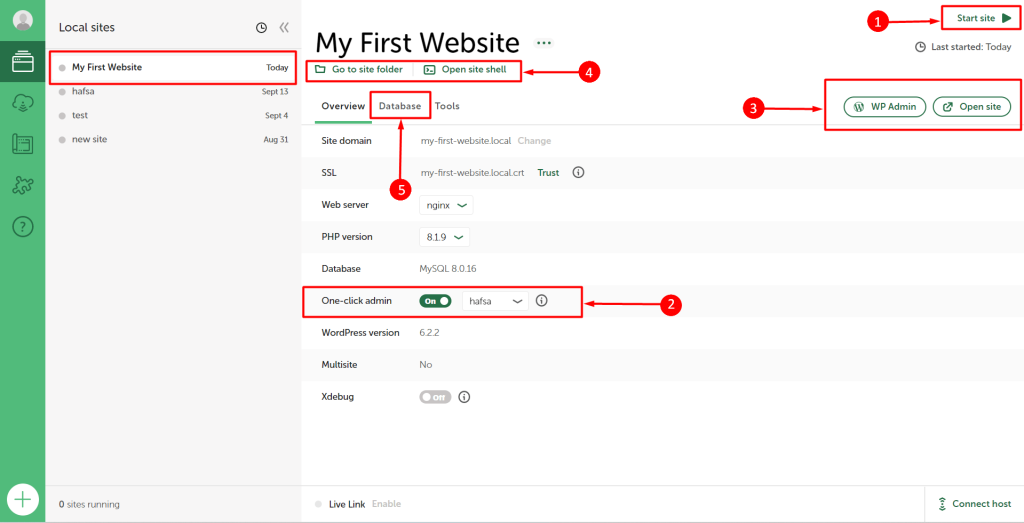
1. Start or Stop a Site
You can create multiple sites locally and run them simultaneously. To do so, you have to start running a site and stop it when you are not using the site.
- To start, click on the website name, then click on “Start Site”
- To stop, click on the red dot at the top right section “Stop site”
📌 You can run multiple WordPress sites on localhost at a time by following the same process.
2. Open the WordPress Site on the Browser
- Turn on the “One-click admin” option and then click on “Open site” to open your WordPress site on your computer browser to see the front-end view.
3. Navigate Administration Interface
- To navigate, edit and customize the WordPress site dashboard, click on “WP admin”
4. Check the Site Folder and Site Shell
- You can also go to the site folder or open the site shell from here.
5. Database Details
- You can see all the details associated with the database of your newly launched WordPress website.
- Navigate “Database” from the local interface
- Click on the “Open Adminer” to navigate the interface to manage your database
How to install WordPress theme and plugins on Localhost
After installing a WordPress site locally, it’s time to add new themes and plugins to add more functionalities and features.
Like the live websites, you can install and activate any free or pro themes and plugins on your local sites.
- Click on the “WP admin” of Local or visit your site’s admin panel like http://my-first-website.local/wp-admin
- Enter the username and password
- You can see the WordPress dashboard
Install New WordPress Theme
The WordPress website has a default theme when you set up the website. You can keep the default Twenty Twenty-Three theme or install a new one.
- To install a new theme, click on Appearance -> Theme
- Click on “Add New”
- Search for the preferred WordPress theme e.g. Astra, Neve, GeneratePress, etc.
- Click on Install
- Then Activate the theme
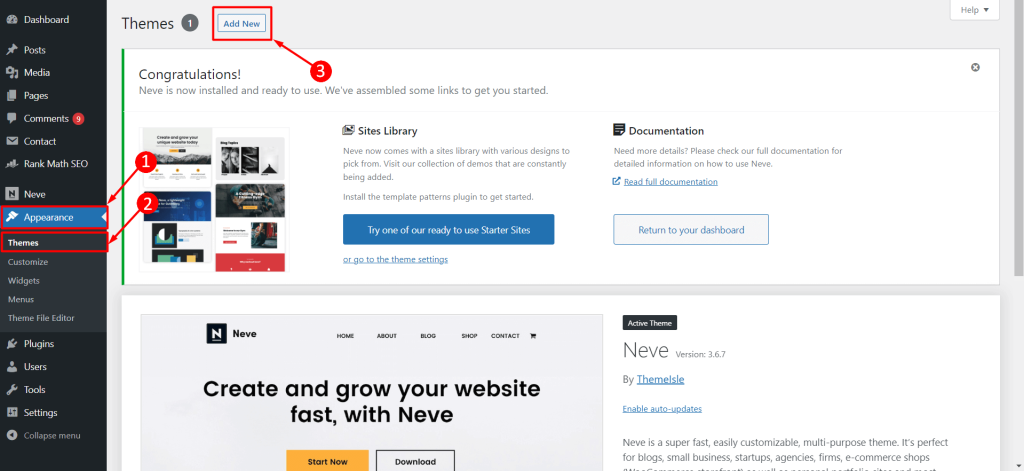
✅ It’s best practice to remove other inactivated themes to speed up your site’s loading time and speed.
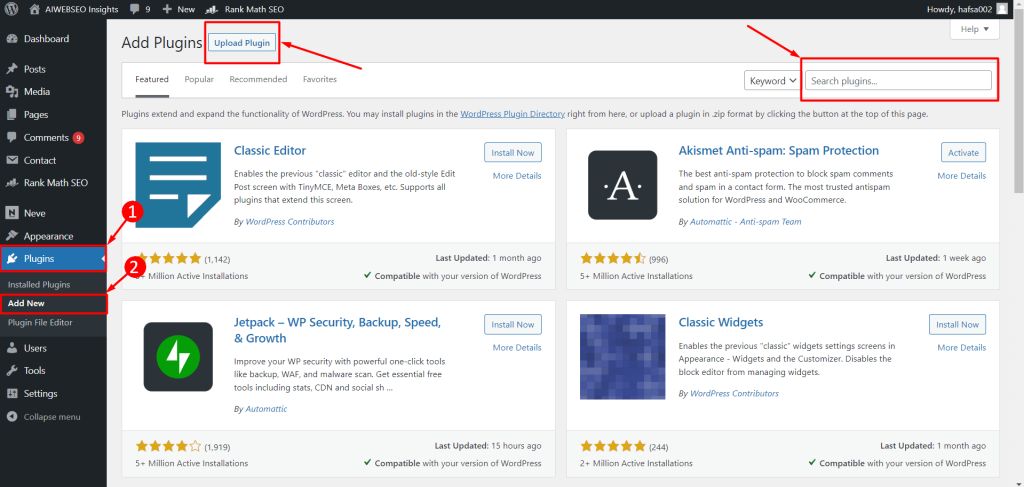
Install New WordPress Plugins
There are thousands of plugins (free and pro) available in the WordPress plugin repository. They are easy to install and activate. Adding plugins will save a lot of time and effort to add complex features to your website.
- To install a new plugin, click on Plugins -> Add new
- Search the WordPress plugin name e.g. Contact Form 7, Elementor, WooCommerce, etc.
- Click on Install and then Activate the plugin
- You can also upload the zip file of any plugin
- Click on “Install” and then activate it.
Check out this blog to learn the 15 Proven Ways to Speed Up Elementor Website 🚀
Why Do You Need To Install WordPress on Localhost?
Installing WordPress in localhost refers to installing it on your own computer instead of a web server. Your computer creates the environment and works like a server.
Here are 5 key reasons why installing WordPress on localhost can be beneficial:
1️⃣ Development Environment
- First of all, WordPress on localhost contains all the functionalities and features of a live website.
- It can be an excellent development environment to develop custom themes and plugins without worrying about the public seeing the unfinished work.
- You can also experiment with new design and development ideas.
2️⃣ Test New Features and Plugins
- You can test new versions of WordPress, features, and any plugins before setting up your live site. It will help you to get a better understanding of new plugins or features.
- You can also test their compatibility with your sites without affecting the live website.
3️⃣ Security
- Next, you can experiment with your local website more securely.
- As all are on your PC, you can work without worrying about outside attacks or any security-related vulnerabilities.
4️⃣ Speed and Performance
- WordPress on localhost runs much faster than any remote server. So it can be useful for large-scale feature testing and development.
5️⃣ Cost-effective
- Finally, installing and setting WordPress on localhost is free of cost. You don’t need to pay for a domain and hosting.
- It’s an excellent option for students who want to learn WordPress and experiment with themes and plugins.
FAQs
Is Local Safe to Use?
Yes, Local by Flywheel or LocalWP is completely safe to install and test WordPress locally. Its robust security, super fast, and user-friendly interface make it a reliable choice for the developer and learners.
Can I Create Multiple Local Websites Under Local?
Yes, you can create multiple local websites using the Local server. You just need to follow the same process that I’ve depicted above. Plus, you can run one as well as multiple sites at a time.
Can I Move The WordPress Localhost Site To Live?
Yes, you can move the WordPress localhost site to live in multiple ways. You can use a third-party plugin(e.g. All-in-One WP Migration) or do it manually. You need to use an FTP client to transfer all files from your local WordPress site to your live server.
Bottom Line
Time to wrap up!
Creating a WordPress website locally is not rocket science, but rather a very simple process that can be done in just a few minutes. Plus, installing and setting up your WordPress site in localhost i.e. LocalWP is totally free to use. And, you will get all the features and functionalities to test and experiment more efficiently.
I’ve provided step-by-step on “How to install WordPress on Localhost” and how to install themes and plugins. By following these simple 3 steps, hopefully, you can create a stunning and functional local WordPress website.
Don’t hesitate to comment below if you want the step-by-step guide to installing WordPress using other local servers(e.g. XAMPP, WAMP) or migrating local WordPress sites to live hosting.
Stay tuned & thanks for reading! 🫶

Thank you for writing this article. I appreciate the subject too.
The Real Person!
The Real Person!
Hi Olivia,
Thank you for your appreciation. Stay tuned! 🤗